Pages

Sunday, April 23, 2017

Ginisang Sardinas with Ampalaya (Sautéed Sardines with Bitter Melon)

Ginisang Sardinas with Ampalaya or Sautéed Sardines with Bitter Melon is a simple Filipino dish that consist of canned sardines in tomato sauce and sliced bitter melon. These are sauted with garlic and onion. I topped the dish with chopped scallions and toasted garlic to make it look and taste better. It is best eaten with rice and can be consumed either for breakfast, lunch, or dinner.

How to Cook Ginisang Sardinas with Ampalaya Recipe Panlasang Pinoy

I cook this regularly when I was still in the Philippines because convenient in many ways. Timewise, it takes me a very short amount of time to prepare the dish. It is ideal if I am busy or in a hurry to complete something or go somewhere but needed a quick meal. It is also favorable financially because it does not cost much. It is budget friendly.

Although it is easy and simple, I am picky when it comes to the brand of sardines that I use. I almost tried all the local sardines brands in the Philippines and I developed a liking on a particular brand because of its quality. I am happy to know that my brand of sardines is available here in the US. This was the reason why I was able to make this dish. Do not let my brand preference get on your way, use any brand of sardines that you prefer.

Ginisang Sardinas with Ampalaya Recipe

I remember having this dish as a kid. Me and my friends would cut a fresh banana leaf from the nearby vacant lot inside the subdivision that we live in Las Pinas. It was a very happy place. In fact, the subdivision is called Happyville. Back then, I haven’t heard of the term “boodle fight” yet, but we were doing it apparently when we scatter a pot of newly cooked rice over the banana leaf and pour all the sauteed sardines over the rice. We ate with our hands, of course. I’m sure that you can imagine how our hands smelled like afterwards. The meal was special though even if it was simple because it was shared equally by everyone.

Ginisang Sardinas with Ampalaya

Try this Ginisang Sardinas with Ampalaya (Sautéed Sardines with Bitter Melon) Recipe. Let me know what you think.

Ginisang Sardinas with Ampalaya
 
Prep time
Cook time
Total time
 
This is a recipe for Sauteed Sardines with bittermelon. It is translated as Ginisang Sardinas with Ampalaya in Filipino.
Author:
Recipe type: Fish
Cuisine: Filipino
Serves: 3
Ingredients
  • 1 large can sardines in tomato sauce
  • 1 medium bitter melon (ampalaya), cored and sliced into thin pieces
  • 1 medium red onion
  • 5 cloves garlic, crushed
  • 2 tablespoons toasted garlic (optional)
  • 2 tablespoons chopped scallions (optional)
  • ⅛ teaspoon ground black pepper
  • 2 teaspoons fish sauce (patis)
  • 3 tablespoons cooking oil
Instructions
  1. Heat oil in a cooking pot
  2. Sauté garlic and onion until the garlic starts to turn light brown.
  3. Add the sliced bitter melon. Continue to sauté for 2 minutes.
  4. Pour the contents of the large can of sardines. Gently stir.
  5. Add ground black pepper and fish sauce. Cover and continue to cook in medium heat for 2 to 3 minutes.
  6. Transfer to a serving plate. Top with chopped scallions and toasted garlic.
  7. Serve. Share and enjoy!
Nutrition Information
Serving size:  3
3.5.3226

Ginisang Sardinas with Ampalaya Recipe Panlasang Pinoy
Read more ...

Friday, April 21, 2017

Ginisang Sardinas with Ampalaya (Sautéed Sardines with Bitter Melon)

Ginisang Sardinas with Ampalaya or Sautéed Sardines with Bitter Melon is a simple Filipino dish that consist of canned sardines in tomato sauce and sliced bitter melon. These are sauted with garlic and onion. I topped the dish with chopped scallions and toasted garlic to make it look and taste better. It is best eaten with rice and can be consumed either for breakfast, lunch, or dinner.

How to Cook Ginisang Sardinas with Ampalaya Recipe Panlasang Pinoy

I cook this regularly when I was still in the Philippines because convenient in many ways. Timewise, it takes me a very short amount of time to prepare the dish. It is ideal if I am busy or in a hurry to complete something or go somewhere but needed a quick meal. It is also favorable financially because it does not cost much. It is budget friendly.

Although it is easy and simple, I am picky when it comes to the brand of sardines that I use. I almost tried all the local sardines brands in the Philippines and I developed a liking on a particular brand because of its quality. I am happy to know that my brand of sardines is available here in the US. This was the reason why I was able to make this dish. Do not let my brand preference get on your way, use any brand of sardines that you prefer.

Ginisang Sardinas with Ampalaya Recipe

I remember having this dish as a kid. Me and my friends would cut a fresh banana leaf from the nearby vacant lot inside the subdivision that we live in Las Pinas. It was a very happy place. In fact, the subdivision is called Happyville. Back then, I haven’t heard of the term “boodle fight” yet, but we were doing it apparently when we scatter a pot of newly cooked rice over the banana leaf and pour all the sauteed sardines over the rice. We ate with our hands, of course. I’m sure that you can imagine how our hands smelled like afterwards. The meal was special though even if it was simple because it was shared equally by everyone.

Ginisang Sardinas with Ampalaya

Try this Ginisang Sardinas with Ampalaya (Sautéed Sardines with Bitter Melon) Recipe. Let me know what you think.

Ginisang Sardinas with Ampalaya
 
Print
Prep time
Cook time
Total time
 
This is a recipe for Sauteed Sardines with bittermelon. It is translated as Ginisang Sardinas with Ampalaya in Filipino.
Author:
Recipe type: Fish
Cuisine: Filipino
Serves: 3
Ingredients
  • 1 large can sardines in tomato sauce
  • 1 medium bitter melon (ampalaya), cored and sliced into thin pieces
  • 1 medium red onion
  • 5 cloves garlic, crushed
  • 2 tablespoons toasted garlic (optional)
  • 2 tablespoons chopped scallions (optional)
  • ⅛ teaspoon ground black pepper
  • 2 teaspoons fish sauce (patis)
  • 3 tablespoons cooking oil
Instructions
  1. Heat oil in a cooking pot
  2. Sauté garlic and onion until the garlic starts to turn light brown.
  3. Add the sliced bitter melon. Continue to sauté for 2 minutes.
  4. Pour the contents of the large can of sardines. Gently stir.
  5. Add ground black pepper and fish sauce. Cover and continue to cook in medium heat for 2 to 3 minutes.
  6. Transfer to a serving plate. Top with chopped scallions and toasted garlic.
  7. Serve. Share and enjoy!
Nutrition Information
Serving size:  3
3.5.3226

Ginisang Sardinas with Ampalaya Recipe Panlasang Pinoy
Read more ...

Thursday, April 20, 2017

Ginisang Sardinas with Ampalaya (Sautéed Sardines with Bitter Melon)

Ginisang Sardinas with Ampalaya or Sautéed Sardines with Bitter Melon is a simple Filipino dish that consist of canned sardines in tomato sauce and sliced bitter melon. These are sauted with garlic and onion. I topped the dish with chopped scallions and toasted garlic to make it look and taste better. It is best eaten with rice and can be consumed either for breakfast, lunch, or dinner.

How to Cook Ginisang Sardinas with Ampalaya Recipe Panlasang Pinoy

I cook this regularly when I was still in the Philippines because convenient in many ways. Timewise, it takes me a very short amount of time to prepare the dish. It is ideal if I am busy or in a hurry to complete something or go somewhere but needed a quick meal. It is also favorable financially because it does not cost much. It is budget friendly.

Although it is easy and simple, I am picky when it comes to the brand of sardines that I use. I almost tried all the local sardines brands in the Philippines and I developed a liking on a particular brand because of its quality. I am happy to know that my brand of sardines is available here in the US. This was the reason why I was able to make this dish. Do not let my brand preference get on your way, use any brand of sardines that you prefer.

Ginisang Sardinas with Ampalaya Recipe

I remember having this dish as a kid. Me and my friends would cut a fresh banana leaf from the nearby vacant lot inside the subdivision that we live in Las Pinas. It was a very happy place. In fact, the subdivision is called Happyville. Back then, I haven’t heard of the term “boodle fight” yet, but we were doing it apparently when we scatter a pot of newly cooked rice over the banana leaf and pour all the sauteed sardines over the rice. We ate with our hands, of course. I’m sure that you can imagine how our hands smelled like afterwards. The meal was special though even if it was simple because it was shared equally by everyone.

Ginisang Sardinas with Ampalaya

Try this Ginisang Sardinas with Ampalaya (Sautéed Sardines with Bitter Melon) Recipe. Let me know what you think.

Ginisang Sardinas with Ampalaya
 
Print
Prep time
Cook time
Total time
 
This is a recipe for Sauteed Sardines with bittermelon. It is translated as Ginisang Sardinas with Ampalaya in Filipino.
Author:
Recipe type: Fish
Cuisine: Filipino
Serves: 3
Ingredients
  • 1 large can sardines in tomato sauce
  • 1 medium bitter melon (ampalaya), cored and sliced into thin pieces
  • 1 medium red onion
  • 5 cloves garlic, crushed
  • 2 tablespoons toasted garlic (optional)
  • 2 tablespoons chopped scallions (optional)
  • ⅛ teaspoon ground black pepper
  • 2 teaspoons fish sauce (patis)
  • 3 tablespoons cooking oil
Instructions
  1. Heat oil in a cooking pot
  2. Sauté garlic and onion until the garlic starts to turn light brown.
  3. Add the sliced bitter melon. Continue to sauté for 2 minutes.
  4. Pour the contents of the large can of sardines. Gently stir.
  5. Add ground black pepper and fish sauce. Cover and continue to cook in medium heat for 2 to 3 minutes.
  6. Transfer to a serving plate. Top with chopped scallions and toasted garlic.
  7. Serve. Share and enjoy!
Nutrition Information
Serving size:  3
3.5.3226

Ginisang Sardinas with Ampalaya Recipe Panlasang Pinoy
Read more ...

Friday, April 14, 2017

Shrimp Fried Rice

Print
Shrimp Fried Rice
Photography Credit: Elise Bauer

Do you ever have leftover rice in the fridge? A great way to use it up is to make fried rice! Fried rice works best with chilled leftover rice actually. Fresh rice can fry up a bit mushy. But leftover rice that had a chance to dry out a bit? Perfect for frying.

Pretty much anything can go into fried rice—usually a combination of veggies, beaten egg, and a protein such as the shrimp we are using in this recipe, or chicken, fish, or tofu.

This recipe for Shrimp Fried Rice comes from my dear friend Jaden of SteamyKitchen.com. She learned how to make the best fried rice from her mother (after a rather funny failed attempt when she was a teen). It’s super easy, and comes together in less than half an hour.

Shrimp Fried Rice

Tricks to Perfect Fried Rice

1. As mentioned, use chilled leftover rice! The dry refrigerator air helps dry the rice a bit, which is why cold leftover rice never tastes as good the next day if you eat it straight, but it’s perfect for frying.

2. Use high heat. You don’t need a blazing hot restaurant kitchen stove, just patience to let your pan get hot. A hot pan will help everything fry quickly and help keep ingredients from sticking.

3. Fry ingredients separately. To keep the ingredients and their flavors from mushing together, cook them separately, yet in the same pan. Start with the protein (in this case the shrimp), cook it until it’s almost done, then remove from the pan, and start cooking the other ingredients—the eggs next, then the rice. Add the protein and eggs back to the rice at the end.

4. Minimize stirring. If you want browning, don’t stir. Just spread the rice out in the pan and let the pan do the work.

Updated from recipe archive, first posted 2008

Shrimp Fried Rice Recipe

Print
  • Prep time: 15 minutes
  • Cook time: 15 minutes
  • Yield: Serves 4

Make sure to use leftover, day old rice when making fried rice. Freshly made rice will make a fried rice that's mushy.

Ingredients

  • 8 ounces small raw shrimp, shelled and deveined
  • 1/2 teaspoon kosher salt
  • freshly ground black pepper
  • 1/2 teaspoon cornstarch
  • 3 tablespoons high smoke point oil such as canola oil or rice bran oil
  • 3 eggs, beaten
  • 2 stalks green onion, minced
  • 4 cups leftover rice, grains separated well
  • 3/4 cup frozen peas and carrots, defrosted
  • 1 tablespoon soy sauce (use gluten-free soy sauce if you are making a gluten-free version), plus more to taste
  • 1 teaspoon dark toasted sesame oil

Method

1 Toss shrimp with salt, pepper, cornstarch: In a medium bowl, sprinkle the shrimp with salt, pepper, and cornstarch, and toss to coat. Set aside to sit for ten minutes at room temperature.

2 Heat pan on high heat: Heat a large sauté pan or wok (a seasoned cast iron pan or hard anodized aluminum works well, they're relatively stick free and can take the heat) on high heat.

When the pan is very hot (a drop of water instantly sizzles when it hits the pan), swirl in one tablespoon of the cooking oil to coat the pan.

3 Sear shrimp on both sides: Add the shrimp to the hot pan, spreading them out quickly in a single layer. Let them fry in the pan without moving them, for 30 seconds.

Flip the shrimp over and let them fry on the other side for another 30 seconds or until they are mostly cooked through. (Do not cook them all the way!)

Use a slotted spoon to scoop the shrimp out of the pan to a bowl.

4 Cook beaten eggs, slightly runny: Return the pan to the burner and lower the heat to medium. Add a little more oil if the pan needs it. Add the beaten eggs and stir them quickly to scramble them while they cook.

When the eggs are not quite cooked through, still a bit runny, transfer them from the pan to the bowl with the cooked shrimp.

5 Sauté green onions, add rice: Clean out the pan or wok with paper towels and return it to the burner. Heat the pan on high and when it is hot, swirl in the remaining tablespoon or two of oil. When the oil is shimmering hot (almost smoking), add the green onions and sauté for 15 seconds.

Then add the leftover cooked rice to the pan and stir with the green onions to mix well.

Spread the rice onion mixture over the surface of the pan and let it fry, without moving it. You should hear the rice sizzle. Cook for about 1 to 2 minutes.

Use a spatula to turn over the rice, and spread it over the pan again. Let cook for a minute longer.

6 Add soy sauce, carrots, peas, shrimp, eggs, sesame oil: Sprinkle soy sauce on the rice and stir to combine.

Add the carrots, peas, shrimp, eggs, and sesame oil, stirring to combine well.

Heat everything until sizzling hot. Add more soy sauce to taste.

Print

If you make this recipe, snap a pic and hashtag it #simplyrecipes — We love to see your creations on Instagram, Facebook, & Twitter!

Read more ...

Wednesday, March 29, 2017

Grilled Trout with Dill and Lemon

Print
Grilled Trout
Photography Credit: Elise Bauer

I once was the proud owner of a fly reel. Just the reel mind you. I was 10 years old and I never did get a fishing rod for that reel. The fishing rod I did have came with its own reel, and was the type with which you used a little bobbing float, and a hook to attach something wriggly.

Hapless in the fishing department, I eventually gifted my gear to my younger brother, and stuck to collecting crawdads, tadpoles, and minnows. Over the years my brother regularly brought home trout (usually steelhead), salmon, and assorted other fish he caught in the American River, a short walk from our house in Sacramento.

Grilled Trout

It was only years later, on a trip to western Montana, that I learned that a fly reel is what is used in fly fishing, which is how one fishes for trout. So now, every time I pass by the fish counter at the market and see beautiful fresh trout staring back at me, I think of fly fishermen, standing in their waders in the shallows of either the Madison or American rivers, casting for a bite.

Trout is, one of the most delicious fish you can eat, and not only is it relatively inexpensive (for fish), it’s really easy to cook. It’s usually sold deboned, and with head and tail.

A video posted by Elise Bauer (@simplyrecipes)

Trout does have rather delicate skin. So rather than grilling it directly on the grill grates, the best way to ensure that the fish holds together and results in a beautiful presentation, is to create an aluminum “boat” to hold the fish, and place that boat on the grill. Keep the boat open, and cover the grill so that the trout absorbs some of the smokiness from the grill.

Grilled Trout with Dill and Lemon Recipe

Print
  • Prep time: 10 minutes
  • Cook time: 8 minutes
  • Preparing the grill time: 15 minutes
  • Yield: Serves 2

Assume one trout per person.

These directions are for grilling trout. If you don't have a grill, you can easily prepare the fish in an aluminum boat in the same way and bake in the oven at 350°F until done.

Ingredients

  • Olive oil
  • 2 trout, boned (also called "butterflied") and cleaned, head and tail still on (or headless if you want)
  • Salt
  • Pepper
  • 6 paper thin slices of fresh lemon, seeded
  • Several sprigs of dill (or basil, tarragon, parsley, any tender fresh herb)
  • 1 teaspoon butter, cut into small cubes

Method

1 Prepare your grill for direct high heat, with one part of the grill cool.

2 While the grill is heating, make one or two "boats" with heavy duty aluminum foil. Double or triple layer the foil and make 1-inch rim around the edges. Coat the bottom of the boat generously with olive oil so that the trout does not stick while it is cooking.

3 Rinse the trout with water and pat them dry. Open up the fish and sprinkle with salt and pepper. Add lemon slices to the inside of the fish in a single layer. Top with sprigs of dill and dots of butter. Close the fish over the stuffing. Brush both sides of the fish with olive oil. Place fish in the aluminum foil boat(s).

4 Place fish boats on the hot side of the grill. Cover and let cook for 3 minutes. The oil and the juice from the fish will get bubbly. Move to the cool side of the grill. Cover and cook for 3-5 more minutes, until the fish are just cooked through. You can peek inside the fish for doneness. Once opaque, the fish should be removed from the grill.

Print

If you make this recipe, snap a pic and hashtag it #simplyrecipes — We love to see your creations on Instagram, Facebook, & Twitter!

Read more ...

Best Ever Tuna Salad Sandwich

Print
Tuna Salad Sandwich
Photography Credit: Elise Bauer

My parents started making tuna fish salad sandwiches this way years ago, and as far as I’m concerned theirs is the best and only way to make a tuna fish sandwich.

First it helps to start with high quality canned tuna. If you have leftover cooked tuna steaks, then by all means use them instead of the canned tuna. Both Trader Joe’s and Whole Foods have excellent canned tuna packed in olive oil. (The brand I like at Whole Foods is Wild Planet.)

Tuna Salad Sandwich

Tuna packed in olive oil may be more flavorful than tuna packed in water, but check on the quality. It may be better to use tuna packed in water, drain it, and then add a bit of your own high quality extra virgin olive oil. This requires a bit of experimentation with brands.

Best Ever Tuna Salad Sandwich Recipe

Print
  • Prep time: 5 minutes

Ingredients

  • 1 (5 or 6 ounce) can of tuna fish (drained, if packed in water, drain it, and add a teaspoon of good quality olive oil to the tuna)
  • 1/3 cup of cottage cheese
  • 2 Tablespoons of mayonaise
  • 1/4 cup finely chopped red onion
  • 1 celery stalk, finely chopped (about 1/2 cup)
  • 1 Tbsp of capers
  • 1 Tbsp lemon juice
  • Pinch or two of dill
  • 2 Tbsp minced fresh parsley
  • 1 teaspoon of Dijon mustard
  • (optional - lettuce and sliced tomatoes)
  • Sliced bread, lightly toasted

Method

Mix all of the ingredients. Serve on toast, either open faced, or in a regular sandwich with lettuce and tomatoes. For a low carb option, serve on sliced lettuce.

Print

If you make this recipe, snap a pic and hashtag it #simplyrecipes — We love to see your creations on Instagram, Facebook, & Twitter!

Read more ...

Tuesday, March 14, 2017

Tuna in Can Sarciado

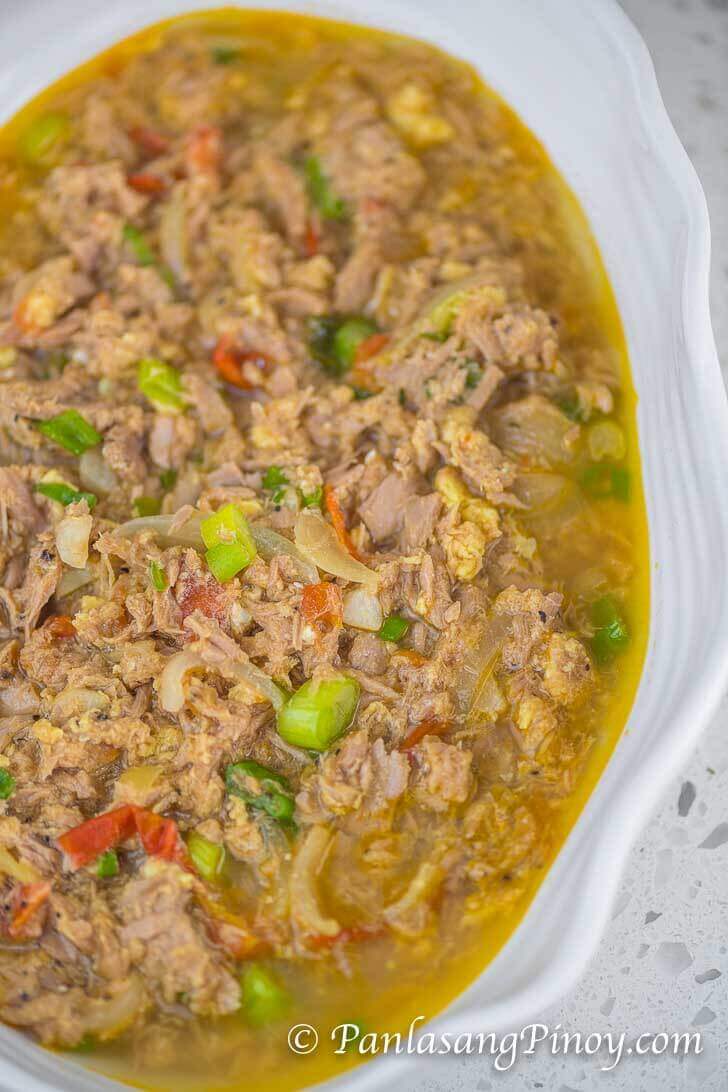
Tuna in can Sarciado was my go to dish when I was still in the Philippines. Actually I had two go to dishes: this one and ginisang sardinas. I was always on the go and did not have the time to prepare my meals. In addition, I also had to manage my budget. It worked well for me– it even taught me a valuable lesson to appreciate the simple things in life.

Tuna in Can Sarciado Recipe Panlasang Pinoy

This was a dish that I usually make for breakfast. It was really good especially if I add lots of tomatoes in it. The recipe below calls for a piece of tomato, but feel free to use more. I think that this was way better compared to eating just regular tuna in can along with fried egg for breakfast when you are having it with rice. Why? Because aside from being colorful and appealing, this dish has a tasty sauce that you can pour over rice. It can increase your appetite and make you enjoy your meal even better.

Tuna in Can Sarciado

I used a bigger can of tuna for this recipe. It is equivalent to two cans of regular tuna in can in the Philippines. There are two types of regular canned tuna as far as I can remember: the one in oil and the other is in water – use the canned tuna in water. There are many different varieties of canned tuna, and some are even prepared to resemble common Filipino dishes such as adobo and Afritada. We do not need these; I am only talking about using plain tuna in water here, just for clarity.

Have you tried making this dish before? Let me know how you liked it. If you have tips and suggestions to share, please send me a comment. Thanks in advance.

Tuna in Can Sarciado Recipe

Try this Tuna in can Sarciado. Let me know what you think.

Tuna in Can Sarciado
 
Prep time
Cook time
Total time
 
This is a recipe for Tuna in Can Sarciado.
Author:
Recipe type: Fish
Cuisine: Filipino
Serves: 4
Ingredients
  • 1 (12oz. can) chunk light tuna in water
  • 1 egg
  • ½ cup chopped scallions
  • 1 medium yellow onion, sliced
  • 1 medium tomato, cubed
  • 3 cloves garlic, chopped
  • ¼ teaspoon ground black pepper
  • 2 tablespoons fish sauce (patis)
  • 1¼ cups water
  • 2 tablespoons cooking oil
Instructions
  1. Heat oil in a pan.
  2. Saute garlic, onion, and tomato until soft.
  3. Add the canned tuna (including the water from the can). Stir. Cook for 3 minutes.
  4. Pour the water into the pan. Let boil.
  5. Beat the egg and then pour into the pan. Let it cook for a few minutes until it starts to form. Stir.
  6. Add ground black pepper and scallions. Cook for 2 minutes.
  7. Pour the fish sauce into the pan. Add more water if preferred.
  8. Transfer to a serving plate. Serve.
  9. Share and enjoy!
Nutrition Information
Serving size:  4
3.5.3226

Watch the Video on How to Coook Tuna in Can Sarciado

Read more ...

Monday, March 13, 2017

Fish Chowder

Print
Fish Chowder
Photography Credit: Elise Bauer

My first job out of college was in Boston, in the financial district downtown. My local friends did their best to initiate this wide-eyed Californian into New England traditions of every sort, especially food.

We feasted on as many menu items as we could afford at the Union Oyster House and the No Name Restaurant, and $5/lb lobsters I would buy from the Italian fish monger across the street from where I lived in the North End.

One dish I could never get enough of was “chowdah”. Clam chowder, fish chowder, seafood chowder, whatever, I loved it.

The word chowder is thought to come from the French “chaudiere”, which is basically a large pot or cauldron used to cook stews like this. There are many regional varieties of chowder.

New England style chowder is white, with cream and potatoes. Traditional New England recipes call for starting out rendering fat from salt pork and then making a roux with flour.

Other recipes skip the salt pork, but use a lot of butter. Most recipes called for a highly flavorful fish stock.

For this particular fish chowder, which we all agreed turned out exceptionally well, we are using olive oil and butter instead of bacon or salt pork. We are skipping the flour and are instead using cream and the starch from the potatoes to thicken the stew. In place of fish stock, we are using flavorful clam juice instead.

Recipe from the archives, first posted 2009

Fish Chowder Recipe

Print
  • Prep time: 15 minutes
  • Cook time: 40 minutes
  • Yield: Serves 6

Ingredients

  • 1 Tbsp olive oil
  • 1 teaspoon butter
  • 2 medium yellow onions, chopped (about 2 cups)
  • 1/2 cup dry white wine (optional)
  • 3 large Yukon Gold potatoes (about 1 1/4 pounds), peeled, cut into 3/4-inch cubes
  • 2 cups clam juice
  • 1 bay leaf
  • 1 Tbsp fresh thyme, or 1 teaspoon dried thyme
  • 1 1/2 teaspoon salt
  • 1/4 teaspoon freshly ground black pepper
  • 1 teaspoon Old Bay (optional, can use a little paprika and a dash of cayenne)
  • 1 1/2 to 2 lbs cod*, or other firm white fish, pin bones removed, fillets cut into 2-inch pieces
  • 1 1/2 cups heavy cream
  • 2 Tbsp chopped fresh parsley

* Here in the west we get Pacific Cod, considered a sustainable fish by Seafood Watch. Pick the best, most sustainable option available to you.

Method

1 Sauté onions in oil and butter, add wine: Heat oil and butter in the bottom of a large pot (6-qt) on medium heat. Add the onions and cook until softened, about 5 minutes.

Add the wine, if using, and turn up the heat, cook, uncovered until the wine reduces by half. (If not using wine, add 1/4 cup of water with the clam juice.)

2 Add potatoes, clam juice, spices, then simmer: Add the potatoes, clam juice, bay leaf, thyme, salt and pepper, and Old Bay spice. (The potatoes should be just barely covered with the liquid in the pot. If not, add water so that they are.)

Bring to a simmer, then lower the heat to medium and cook, covered, until the potatoes are almost done, about 10-15 minutes.

3 Heat cream: In a separate pot, heat the cream until steamy (not boiling).

4 Add fish to soup, add hot cream: Add the fish to the pot of potatoes and add the heated cream. Return to the stove. Cook on low heat, uncovered, until the fish is just cooked through, about 10 minutes.

Keep your eye on the heat! If you are using straight heavy cream you should be more easily able to avoid curdling, even if the soup starts to boil. But if you are substituting light cream, half and half, or milk, the mixture will likely curdle if it gets near boiling point (one of the reasons I like using straight heavy cream).

Keep the temperature so that it barely gets steamy, but not simmering.

When the fish is just cooked through, remove from heat.

Mix in the parsley. The flavors will improve if the soup rests 30 minutes before serving.

Serve with crusty bread or oyster crackers (not for gluten-free version).

Print

If you make this recipe, snap a pic and hashtag it #simplyrecipes — We love to see your creations on Instagram, Facebook, & Twitter!

Read more ...

Shrimp Gumbo with Andouille Sausage

Print
Shrimp Gumbo with Andouille Sausage
Photography Credit: Elise Bauer

It’s Mardi Gras season, time for gumbo! If you question anybody from Louisiana or the Mississippi Sound about making gumbo, the first thing they will tell you is about making the roux.

My college roommate (from Metairie), my brother’s girlfriend (Biloxi), and my parent’s neighbor of 35 years (New Orleans), have pretty much all told me the same thing, “My mother used to take out an old penny and sit it next to the pot. ‘You’re done when the roux is the color of this penny.'”

Now, these women certainly did not have the same mother, but they shared the same story. I’m guessing making a proper roux must be a rite of passage for a kid from around those parts, and probably a bit challenging because it requires a little patience. 25 minutes or so of stirring can seem like forever to a 10 year old!

Shrimp Gumbo with Andouille Sausage

But it really is the roux that makes the difference. The slow cooking of of oil and flour together create a wonderful flavor as the flour browns.

Now, I’ve also read about gumbos made with a “blonde” roux, in which the roux is not browned nearly as much. So, I would love to get your opinion on this if you are familiar with the various approaches to making gumbo.

Enjoy!

A Mardi Gras classic from the recipe archives, first published 2013

Shrimp Gumbo with Andouille Sausage Recipe

Print
  • Prep time: 15 minutes
  • Cook time: 1 hour, 30 minutes
  • Yield: Serves 6-8

If you are not familiar with filé (fee-lay), it is a powder made from dried sassafras leaves. It is a powerful thickener, but must be added at the end of cooking or it will form slimy, ropey strands in the gumbo. Filé is available in many supermarkets (we found ours at Whole Foods), or online.

Ingredients

  • 1/2 cup peanut oil, or other vegetable oil
  • 1/2 cup flour
  • 1 green pepper, chopped
  • 1 medium onion, chopped
  • 3 celery stalks, chopped
  • 4 garlic cloves, minced
  • 1 Tbsp Cajun seasoning
  • 1 quart shellfish* or chicken stock, plus 1 cup water
  • 2 teaspoons Worcestershire sauce
  • 8-12 ounces smoked andouille sausage, cut into 1/4-inch thick rounds
  • 2 pounds shrimp, peeled and deveined
  • Salt and pepper to taste
  • 3-5 green onions, white and green parts, chopped
  • File powder (optional)
  • Hot sauce (such as Tabasco) to taste

* Note that you can make your own shellfish stock with the shells from the shrimp. Put the shrimp shells and tail tips in a pot and cover with 2 quarts of water.  Bring to a boil, reduce to a simmer, and simmer uncovered for an hour. Strain and use in this recipe for the stock. Diluted bottle clam juice will also work as shellfish stock in this recipe.

Method

1 First, make the roux. Heat the peanut oil in a large, thick-bottomed pot, such as a Dutch oven, on medium high heat, for a minute or two. Whisk in the flour and lower the heat to medium. Stir almost constantly, making sure to scrape the bottom of the pan as you stir.

Let the roux cook until it is the color of peanut butter, then lower the heat to medium low. Keep cooking and stirring (careful, you want the flour to cook, not burn!) until the roux is the color of an old penny, about 20-30 minutes total time.

2 Mix in the "holy trinity" of green pepper, onion and celery and increase the heat to medium-high. Cook, stirring often, for 5 minutes.

Add the garlic and cook another 2 minutes. Stir in the Cajun seasoning.

3 Slowly add stock, then simmer: In a separate pot, heat the stock and water until steamy. Slowly add the steamy stock and water to the bell pepper onion roux mixture, stirring constantly while you do so.

Bring the gumbo to a simmer and add the Worcestershire sauce and salt to taste. Simmer gently for 30 minutes.

If you find that the roux has broken a bit and oil is pooling on the surface of the gumbo, whisk in about another 1/2 to 1 cup of water. This will often "fix" it.

4 Stir in the andouille sausage and cook for 5 minutes (andouille sausage is already cooked, so you just need to heat it).

5 Add the shrimp, return to a simmer and cook another 5 minutes, until the shrimp has just cooked through. Add salt and black pepper to taste.

Serve with white rice, garnished with green onions. To eat, sprinkle with filé powder and hot sauce.

Print

If you make this recipe, snap a pic and hashtag it #simplyrecipes — We love to see your creations on Instagram, Facebook, & Twitter!

Read more ...