Pages

Tuesday, April 28, 2015

Pancetta-wrapped salmon with griddled asparagus and lime crème fraîche Nutritional info per serving

salmon-7-asparagus This salmon recipe is ideal if you're entertaining because it looks the height of sophistication but won't break the bank.

INGREDIENTS

  • 2 bunches English asparagus, woody ends removed
  • 2 tbsp olive oil
  • 4 skinless salmon fillets
  • 8 pancetta rashers
  • 100ml crème fraîche
  • 2 tbsp mayonnaise
  • Grated zest of 1 lime and juice of ½

METHOD

  1. Preheat the oven to 220°C/fan200°C/gas 7. Place the asparagus in a shallow roasting tin and toss with half the olive oil. Season well and roast in the oven for 5 minutes.
  2. Meanwhile, season each salmon fillet, wrap in 2 pancetta rashers and brush with the remaining olive oil. Once the asparagus has been cooking for 5 minutes, remove from the oven and place the salmon on top. Return to the oven for a further 8-10 minutes until the salmon is just cooked and the pancetta is crisp.
  3. Mix together the crème fraîche and mayonnaise, then stir through the lime zest and juice. Season and serve with the asparagus and salmon.
post from sitemap
Read more ...

Saturday, April 25, 2015

Calamari Stewed with Tomatoes

Squid can be cooked one of two ways: For the blink of an eye, or for a long, long time. Anything in between and it is rubbery. This dish, which is our version of a Southern Italian classic called calamari in umido, takes the long view of calamari cooking.

Think of this dish as something between a stew and a pasta sauce. It’s every bit as good as-is—with crusty bread, of course—as it is accompanying pasta (go with a short pasta like penne, bowties or fusilli) or, even better, a creamy polenta. You can even add a little cheese to the polenta, if no one’s looking. Italians rarely mix seafood and cheese.

Calamari Stewed with Tomatoes Recipe

  • Prep time: 15 minutes
  • Cook time: 1 hour, 20 minutes
  • Yield: Serves 4-6.

You can buy frozen, cleaned squid in the freezer section of many grocery stores. Defrost by placing in refrigerator overnight, or in a bowl of ice water. This recipe does call for an anise-flavored liquor, which you can leave out if you want, but the dish will be better with it in.

Yum

Ingredients

  • 2 pounds cleaned calamari (squid), tubes sliced into rings and tentacles roughly chopped
  • 4 Tbsp olive oil
  • 1 sliced onion
  • 1 fennel bulb, chopped
  • 3 garlic cloves, chopped
  • 2 Tbsp tomato paste
  • 1/4 cup Sambuca or other anise-flavored liquor
  • 1 cup red wine
  • 1 28-ounce can of crushed tomatoes
  • Salt and pepper
  • 1/2 cup parsley, chopped
  • 1/4 cup fennel fronds, chopped

Method

1 Heat the olive oil in a large pot over medium-high heat. When the oil is hot, add the onions and fennel. Stir to coat with oil and sauté, stirring occasionally, until it begins to color, about 5-6 minutes. Sprinkle some salt over it. Add the garlic cloves and tomato paste and stir well to combine. Cook this for another 2-3 minutes, stirring once or twice.

2 Add the red wine, stir well, and increase the heat to high. Boil until the liquid is reduced by half.

3 Add the Sambuca or other anise-flavored liquor, and the crushed tomatoes. Stir in the calamari and bring the pot to a gentle simmer. Simmer for at least 1 hour. After an hour, taste a piece of calamari; It should be tender. If it’s not, keep simmering. Check for tenderness every 15 minutes afterward.

4 Once the calamari is tender, taste the stew for salt and pepper, adding if needed. Add the chopped parsley and fennel fronds. Stir well to combine and serve.

post from sitemap
Read more ...

Monday, April 20, 2015

Smoked mackerel with warm chickpea salad and harissa dip Nutritional info per serving

475278-1-eng-GB__smoked-mackerel-with-warm-chickpea-salad-and-harissa-dip This salad recipe with mackerel and chickpeas is a really quick and tasty weeknight supper.

INGREDIENTS

  • Olive oil for frying and drizzling
  • 1 onion
  • Pinch chilli flakes
  • 200g broccoli florets
  • 400g tin chickpeas
  • Handful spinach leaves
  • 1 tsp harissa paste
  • 100g thick natural yogurt
  • 4 smoked mackerel fillets
  • Fresh coriander leaves
  • Toasted flatbreads (optional), to serve

METHOD

  1. Heat a little olive oil in a small pan. Finely slice the onion, then fry with the chilli flakes for 10 minutes or until softened. Season well.
  2. Meanwhile, bring a medium pan of salted water to the boil. Blanch the broccoli until tender, then drain and set aside.
  3. Drain and rinse the chickpeas, then stir through the onions and cook for 5 minutes. Stir in the spinach and broccoli, then toss with a drizzle of oil and season well.
  4. In a small bowl, loosely mix the harissa into the yogurt and season. Divide the chickpea mix among plates, then flake the mackerel fillets on top. Scatter with coriander, then serve with the harissa dip and toasted flatbreads, if you like.
post from sitemap
Read more ...

Breaded harissa cod with lemon and red onion couscous Nutritional info per serving

Breaded-harissa-cod-with-lemon-and-red-onion-couscous A super healthy cod recipe served with a fragrant lemon and red onion couscous.

INGREDIENTS

  • 1 tbsp olive oil
  • 1 red onion
  • 1 garlic clove
  • 4 tsp harissa paste
  • 4 sustainably sourced frozen cod (or other white fish) fillets, defrosted
  • 40g dried breadcrumbs
  • 1 lemon
  • 250g couscous
  • 400ml hot chicken stock
  • Bunch fresh flatleaf parsley

METHOD

  1. Heat the oil in a large frying pan. Slice the onion, then fry for 5 minutes or until softened but not coloured. Finely chop the garlic, then add to the pan and cook for 2-3 minutes more. Season and set aside. 
  2. Meanwhile, heat the grill to medium. Spread the harissa paste on top of the fish, then sprinkle over the breadcrumbs. Finely zest the lemon, then sprinkle over the fish. Grill for 10-12 minutes until the fish is just cooked – the flesh should be  opaque. If the breadcrumbs brown too soon, move the fish lower in the grill. 
  3. While the fish is cooking, put the couscous in a bowl, pour over the hot stock and cover with cling film. Leave for 5-10 minutes to absorb, then fluff with a fork.
  4. Roughly chop the parsley and juice the lemon, then stir through the couscous with the fried onion and garlic. Taste, season and serve in bowls, topped with the fish.
post from sitemap
Read more ...

Yogurt and turmeric fish curry Nutritional info per serving

474467-1-eng-GB_yogurt-and-turmeric-fish-curry This fish curry is simple to make, and perfect for a quick and easy midweek meal.

INGREDIENTS

  • 200g basmati rice
  • 450g frozen, sustainable white fish, defrosted
  • 2 tsp ground turmeric
  • 250g Greek yogurt
  • 2 garlic cloves
  • Good knob of butter
  • 1 medium onion
  • 1 tsp ground coriander
  • 1 tsp garam masala
  • Handful fresh coriander

METHOD

  1. Put the rice in a lidded saucepan with 240ml water and a pinch of salt. Bring to the boil, cover tightly, then turn down the heat to as low as it will go and cook for 15 minutes, without removing the lid.
  2. Chop the fish into chunks. In a bowl, mix the turmeric and yogurt, then crush in the garlic. Season well, gently stir in the fish to coat and leave to marinate for 10 minutes.
  3. Meanwhile, melt the butter in a large wok or frying pan over a low-medium heat. Chop the onion, add to the butter and stir. Fry gently for 10 minutes or until softened.
  4. Add the ground coriander and garam masala, stir for 1 minute, then add the fish and marinade and bring to a simmer. Cover and gently simmer for 7 minutes or until the fish is cooked through. Add a splash of water if you think it needs it. Taste, seasoning if necessary.
  5. Take the rice off the heat, remove the lid and fluff up with a fork. Chop the fresh coriander. Serve the curried fish in bowls along with the rice, sprinkled with the fresh coriander.
post from sitemap
Read more ...

Friday, April 17, 2015

Healthy Foods to Reduce Stress


If you arrive late to work, moving to a new home or struggling to pay the bills, sorry - the chemical reaction that makes your heart race and tense muscles. And when untreated and poorly managed, stress wreaks havoc on your health. It makes you more susceptible to diseases like the common cold, increases blood pressure and increases the risk of diabetes and depression. You may already know that exercise and meditation are healthy ways to reduce stress, but the nutrients certain healthy foods can also help.

Certain healthy foods can help lower stress.Certain healthy foods can help lower stress


Ohmm With Dark Chocolate

Feeling stressed? Go ahead and eat some dark chocolate. Resveratrol, an antioxidant found in chocolate, stimulates the release of serotonin in the brain. This chemical that changes the state of mind has been shown to make you feel relaxed and happy. Nutrients in dark chocolate also improves blood circulation and lowers blood pressure. While this sweet offers a number of health benefits for emphasis not want to over do it. An ounce of dark chocolate a day should be enough to help you cope. Lisa Cimperman, Academy of Nutrition and Dietetics spokesperson, also suggests non-alkaline dark chocolate containing at least 70 percent cocoa to get the greatest benefits.

Dark chocolate stimulates chemicals that make you feel relaxed.
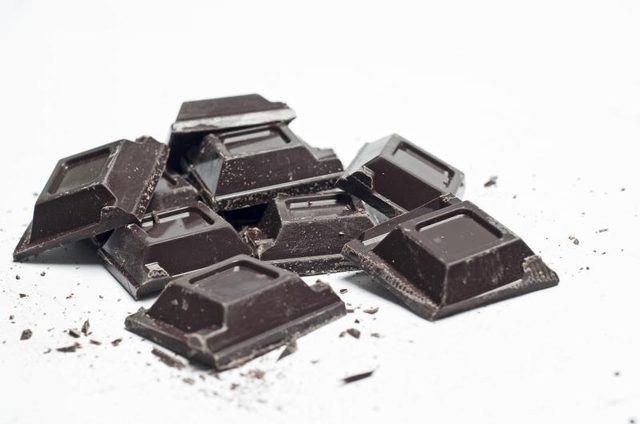
Dark chocolate stimulates chemicals that make you feel relaxed. (maria17/iStock/Getty Images)

Stress-busting Salmon

Omega-3 in salmon are not only good for the heart, but researchers say it can also help to better manage stress. Essential fatty acids found in salmon protect neurons against damage caused by stress, which is particularly useful for those who deal with chronic stress. For good health, try eating salmon or other fatty fish such as tuna or sardines twice a week. If you are not in fish, flaxseed or walnuts Cimperman suggest getting your omega-3.

The essential fatty acids in salmon protect neurons from stress damage.
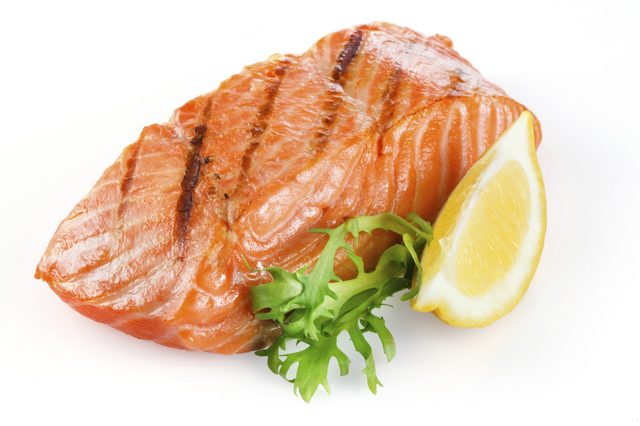
The essential fatty acids in salmon protect neurons from stress damage. (iStock/Getty Images)

A Banana a Day

Low in calories and easy to access, bananas are a good food to add to your stress reduction regime. Vitamin B6 deficiency decreases production of serotonin, according to naturopathic doctors and Kathleen A. Gregory S. Kelly head. Bananas make a regular part of your diet list stores levels of vitamin B6 and the production of serotonin in place. Bananas are also rich in potassium, a nutrient that helps lower blood pressure.

The high potassium levels in bananas can help reduce blood pressure.
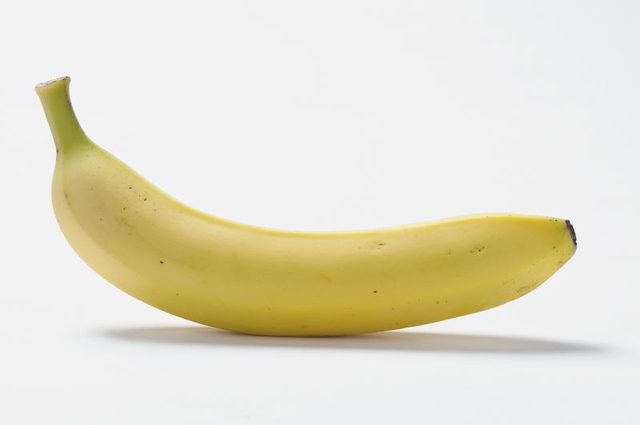
The high potassium levels in bananas can help reduce blood pressure. (Howard Shooter/Dorling Kindersley RF/Getty Images)

Anti-Anxiety Swiss Chard

Cortisol is the main hormone responsible for stress response. He prepares the body for fight or flight reactions, flooding glucose for immediate energy. Chronic stress reduces magnesium in your body, and increase low levels of sensitivity to stress, which aggravates the effects, according to some researchers. If stress is making you feel anxious, angry and agitated, your body may be deficient in magnesium. With a glass 150 milligrams per serving cooked spinach can magnesium intake, balance cortisol levels and helps reduce anxiety.

Swiss chard is high in magnesium, which can help reduce anxiety.
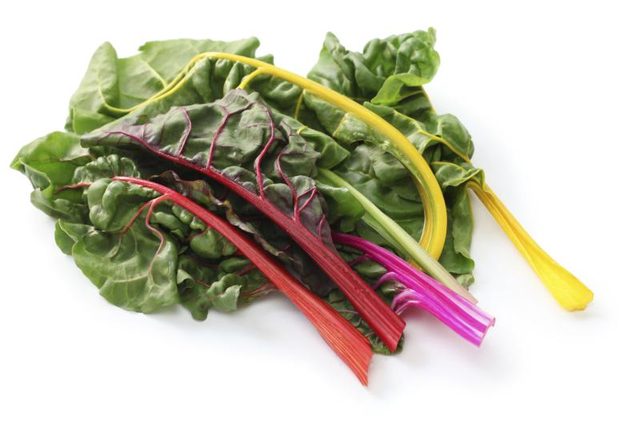
Swiss chard is high in magnesium, which can help reduce anxiety. (bonchan/iStock/Getty Images)

Tea Time

Green and black tea contains L-theanine amino acid. This amino acid increases the production of dopamine and serotonin. Such as serotonin, dopamine is a chemical welfare in the brain that promotes fun. So even if a cup of green tea has more caffeine, sometimes a cup of coffee, L-theanine can eliminate the incentive to promote feelings of joy and relaxation in some people.

The amino acid found in tea releases feel-good chemicals in the brain.
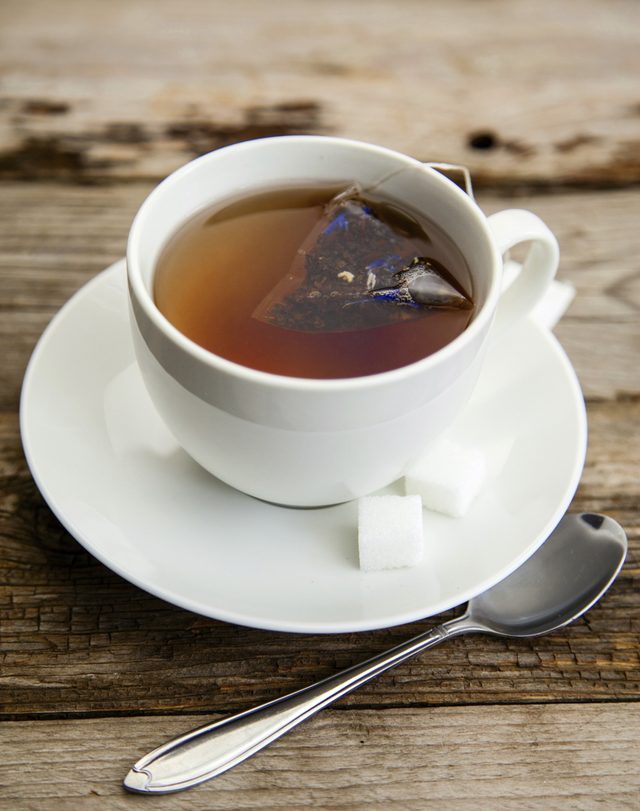
The amino acid found in tea releases feel-good chemicals in the brain. (Natalie_B/iStock/Getty Images)

Immune-Boosting Red Peppers

Crunchy and sweet red peppers, not only add color to a stir-fry or salad, but also stimulates the stress of health and immune combat. A 1/2 cup red peppers portion contains 158 milligrams of vitamin C - which is more than a drink 6 ounces of orange juice. It also has more vitamin C than the Recommended Dietary Allowance (RDA) of 90 milligrams to 75 milligrams for men and women. According to Dr. Dr. Kelly and head, increase intake of vitamin C in higher quantities than the RDA helps to lower cortisol levels - they recommend to 1 gram per day. This is especially important for men who tend to have higher cortisol levels than women.

Red bell peppers are high in vitamin C and can lower cortisol levels.
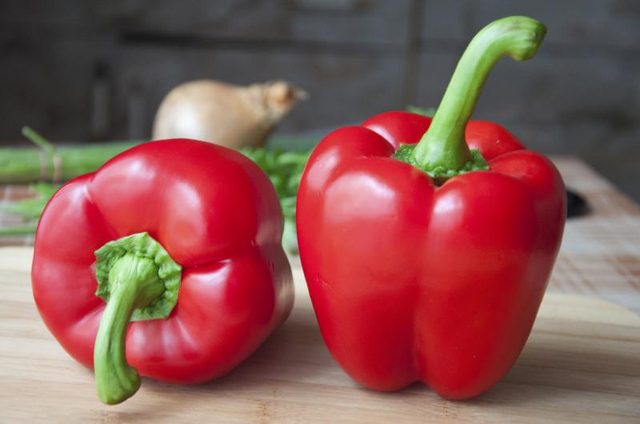
Red bell peppers are high in vitamin C and can lower cortisol levels. (carotur/iStock/Getty Images)

Power-Up With Beans

B vitamins are known to help extract energy food you eat, but they also have an important role in stress management. Promotes sleep niacin, pantothenic acid (vitamin B5) and regulate cortisol in stressful situations thiamine and folic acid is required for neuronal regeneration. Beans are not only a good source of B vitamins, but are also rich in fiber, protein and iron. A whole beans 1/2 cup portion, including black beans, kidney beans or chickpeas, can help you get the B you need to work on stress. Stir in beans in soups, salads or whole grain dishes for added texture and flavor.


Beans contain niacin, which promotes sleep.
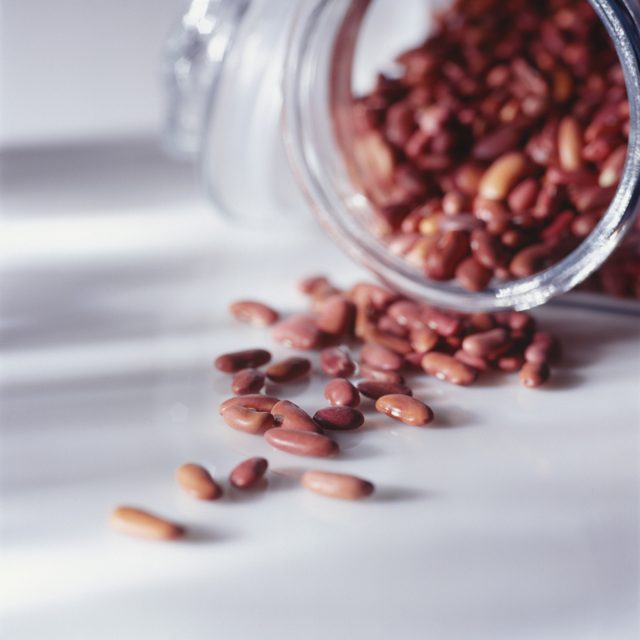
Beans contain niacin, which promotes sleep. (Photodisc/Photodisc/Getty Images


Read more ...

Curried Spinach and Artichoke Skillet Pot Pie


Curried Spinach and Artichoke Skillet Pot Pie

This pie combines some of my favorite ingredients - puff pastry, spinach and curry powder in Japanese. An unexpected combination, I know. But I promise that this pie is incredibly delicious! The spinach artichoke filling is soft and creamy, beautiful stained yellow from the curry powder and topped with puff pastry, golden pie crust.

I created this recipe from a desire to convert the classic spinach artichoke dip into a complete meal. But I also wanted it more interesting, so I added a bit of curry powder. My curry powder curry powder choice is S & B. It is soft filling, very complete and perfect creamy spinach artichoke. I tried many curry powder and I think that one of the most. If you can not find S & B, use mild curry powder on hand.

Curried Spinach and Artichoke Skillet Pot Pie

I use a good cast iron skillet to fill this pie, and then I shot the mass just above the pan and bake. A dish with very little cleaning required is easy. If you do not have an oven proof skillet, transfer the spinach filling an oven-proof dish, place the puff pastry on top and bake. You can also make meat pies in individual dishes. However you do it, just make sure to put the pie on a baking sheet, because the liner may overflow.

Curried Spinach and Artichoke Skillet Pot Pie

Skillet Pot Pie with Spinach and Artichoke Recipe

Serves 2-3

Ingredients

1 frozen puff pastry sheet

1 tablespoon olive oil

1/2 medium onion, diced

2 garlic cloves, peeled and chopped

2 cups frozen spinach

1/2 cup canned, drained, quartered artichoke hearts

2 small carrots, cubed

2 teaspoons Japanese style curry powder

2 cups whole milk

2 tablespoons flour

1/4 cup grated parmesan, optional

Salt

Preheat oven to 400 degrees F

Method

1. Leave the puff pastry sheet out to thaw at room temperature. It will take about 20 minutes to thaw. While the puff pastry is thawing, work on the spinach filling.

2. Heat oil in a 9-inch cast iron skillet or other oven proof skillet. Add the onions. Cook on medium heat until they are soft. Then add the garlic and stir for 30 seconds.

3. Throw in the spinach, artichoke hearts, carrot, and curry powder. Cook for 1 minute.

4. Whisk the milk and flour together in a small bowl until there are no lumps. Pour it over the spinach. Crank the heat up to high and let the sauce come to a boil.

5. Add Parmesan and salt. Mix well and turn off the heat.

6. Cut the puff pastry so that it fits over the skillet with a bit of over hang. Carefully place the puff pastry on top of the skillet. Gently the press it onto the rim of the skillet. Pierce the middle of the puff pastry with a sharp knife to allow steam to escape.

7. Place the skillet on a baking sheet (to catch any filling that bubbles over) and place in the oven. Bake for 10 minutes or till the puff pastry is golden.


Read more ...

Tuesday, April 14, 2015

Tokwa and Tuna Recipe

Tokwa and Tuna is an appetizer dish composed of fried extra firm tofu and grilled ahi tuna. A Filipino dish called Tokwa’t Baboy, which is made up of tofu and pork, was the inspiration for this dish. I thought that using ahi tuna will compliment the fried tofu – and it did.

Tokwa and Tuna Recipe

I think that Tokwa and Tuna have some similarities with kinilaw or kilawin and sinuglaw; all these Filipino food favorites are all soaked in a vinegar mixture and all make a good appetizer or “pulutan”.

Tokwa and Tuna_

This dish is a good option for those of you who like the idea of a healthier and leaner tokwat baboy (without the pork though). You’ll get a good amount of the protein from the fish and tofu and you will worry less on having bad cholesterol or a possibility of getting high blood pressure after eating this dish.

Try this Tokwa and Tuna recipe. Let me know your what you think.


Tokwa and Tuna Recipe
 
Author: 
  • Serves: 4
  • Serving size: 4
    Prep time: 
    Cook time: 
    Total time: 
    Ingredients
    • 6 oz. ahi tuna
    • 14 oz. extra firm tofu
    • 1 medium red onion, sliced
    • 3 pieces long green chili, sliced
    • ¾ cup apple cider or cane vinegar
    • 2 tablespoons soy sauce
    • 2 tablespoons granulated white sugar
    • 1½ cups cooking oil
    • Salt and ground black pepper
    Instructions
    1. Combine the vinegar, soy sauce, and sugar in a bowl. Mix well. Microwave for 15 seconds. Set aside.
    2. Rub ¼ teaspoon salt and ⅛ teaspoon ground black pepper on the ahi tuna. Let it stay for 15 minutes.
    3. Heat-up the grill. Grill the tuna for 3 to 5 minutes per side.
    4. Remove the tuna from the grill. Slice into cubes. Set aside.
    5. Heat the oil in a deep cooking pot.
    6. Once the oil is hot, deep fry the tofu (two pieces at a time) until the color turns golden brown.
    7. Remove the tofu from the cooking pot. Let the excess oil drip. Slice the tofu into cubes. Set aside.
    8. Combine the tuna, tofu, onion, and green pepper in a mixing bowl. Toss.
    9. Pour-in the vinegar mixture. Gently toss until all the ingredients are well blended.
    10. Transfer to a serving plate or bowl.
    11. Serve. Share and enjoy!
    3.2.2925


    Want to start your own blog?

    We can help. Click this link to view the tutorial on How to Start a Blog . If you have questions, I am here to help. Send me a message using the contact page.


    Recommended for you


    post from sitemap
    Read more ...

    Thursday, April 9, 2015

    Broiled Lobster Tail with Brown Butter Sauce

    Broiled lobster tail—the quintessential fancy dinner menu item, isn’t it? Unlike whole boiled or steamed lobster, which is almost impossible to eat delicately, with broiled lobster tail the work has already been done for you. The perfectly cooked meat sits atop the lobster’s bright red shell. All you have to do is cut and eat. Of course this requires a bit more effort on the part of the one preparing the lobster tail. The lobster’s hard shell must be cut open, the meat dislodged from the walls of the shell and pulled out to rest on top before broiling. But in the end, you have a lovely meal that doesn’t require bibs, nutcrackers, or wads of napkins.

    For this lobster tail recipe we are using a sauce of browned butter with parsley, lemon zest, shallots, and some toasted hazelnuts. If you don’t want to go to that trouble, you can just use plain melted butter with some salt, pepper, and maybe a little paprika to dust the top of the lobster meat before broiling. But I highly recommend browning the butter first. Just that extra step will intensify the butter flavor which goes so well with lobster. I’ve made broiled lobster both ways and will not go back to plain butter. Browned is so much better. Toasted hazelnuts are also rather buttery in taste add a lovely crunch to each bite. Do you have a special way of preparing lobster tails? Please let us know about it in the comments. Thanks!

    Broiled Lobster Tail with Brown Butter Sauce Recipe

    • Prep time: 20 minutes
    • Cook time: 25 minutes
    • Yield: Serves 2.

    If starting with frozen lobster tails, prepare a bowl with 2 quarts of cold water and 1 Tbsp salt. Stir to dissolve the salt. Place the lobster tails in the water. Add a few ice cubes. Let sit for half hour to an hour until defrosted.

    This recipe calls for lobster tails that are 6 to 8 ounces each. If you are cooking smaller or larger lobster tails, you'll need to adjust the broiling time down or up. For example, a 3 ounce lobster tail should take 3 to 4 minutes to broil.

    The trickiest part of working with lobster tails is opening the shell and loosening the meat enough to pull it through the cut you've made in the shell. Depending on at what point of the lobster's molting cycle the lobster was caught, the shell can be either really thick and strong, or thin and easy to manipulate. Take care if working with an especially hard shell so you don't cut yourself, and use a strong hand. (I recommend watching this video for a good explanation of the technique.)

    Yum

    Ingredients

    • 2 lobster tails 6-8 ounces each, fresh or frozen
    • 1/4 cup unsalted raw hazelnuts
    • 8 Tbsp unsalted butter
    • 2 Tbsp minced shallots
    • 1 teaspoon chopped fresh parsley
    • 1/4 teaspoon grated lemon zest
    • Pinch of salt

    Method

    If starting with frozen lobster tails, while the lobster tails are defrosting, prepare the hazelnut brown butter sauce.

    broiled-lobster-hazelnuts-1 broiled-lobster-hazelnuts-2 broiled-lobster-hazelnuts-3 broiled-lobster-hazelnuts-4

    1 Toast hazelnuts in a small skillet on medium to medium high heat. When fragrant and lightly browned, remove hazelnuts from pan and place in the center a dry, clean dish towel. Rub the hazelnuts together inside of the dish towel to remove as much of the papery dark skins as you can. Coarsely chop them and set aside.

    broiled-lobster-browned-butter-1 broiled-lobster-browned-butter-2 broiled-lobster-browned-butter-3 broiled-lobster-browned-butter-4

    2 In a small stainless steel saucepan, melt the butter on medium heat. (Use stainless so you will easily be able to tell when the butter is browning.) After the butter melts, it will foam up, and recede. The milk solids will fall to the bottom of the pan. Continue to heat and the milk solids will start to brown giving the melted butter a wonderful nutty aroma. Let most of the milk solids brown and then remove from heat and strain through a fine mesh strainer into a bowl, to remove the browned milk solids.  Remove 2 Tbsp of the melted browned butter and set aside (they will be brushed on to the lobster tails before broiling. (See more details in How to Brown Butter.)

    3 To the remaining brown butter, add the chopped hazelnuts, parsley, shallots, lemon zest and salt. Set aside.

    broiled-lobster-4a broiled-lobster-4cbroiled-lobster-4b broiled-lobster-4d

    4 Place rack in medium position in oven. Preheat broiler. Place a layer of foil over a broiling pan or roasting pan. Using kitchen shears or strong scissors, cut the top side of the lobster tail shells lengthwise, from open end to the base of the tail. To help make the shell easier to teal with, put the tail upside-down in the palm of your hand and squeeze to break the translucent bottom shell (see this useful video I found on YouTube). Grip the sides of the shell and pull open by about an inch or two. Using your finger, carefully wiggle between the lobster meat and the shell and separate the meat from the shell.   Then gently pull the meat up through the crack you've created, keeping the meat attached to the tail, and let the lobster meat sit on top of the shell. Place the tails on the foil-lined broiling pan.

    broiled-lobster-5a broiled-lobster-5b

    5 Pull back the lobster meat to expose as much of it as possible. Brush the exposed lobster meat with the unadorned browned butter you set aside in step 2. Broil for 7 to 10 minutes until the meat is cooked through (less time for smaller lobster tails), and the shells are bright red. I recommend using a meat thermometer, which should read 145°F when the lobster is done.

    6 When the lobster tails are done, remove from oven and place on serving plates. Spoon the browned butter hazelnut sauce over the lobster meat of the lobster tails to serve.

    post from sitemap
    Read more ...

    Angel Hair Pasta with Shrimp and Parmesan Lemon Cream Sauce

    Some recipes are just so good I can’t wait to share them with you, and this is one of them. It’s simple. Just peeled shrimp, cooked just through in a sauce of cream and lemon juice, and tossed with herbs, angel hair pasta, and some freshly grated Parmesan cheese. My dad was over when we were making it and kept looking up from his bowl saying, “oh, this is a good one.” I’ve been poking into the fridge all afternoon sneaking more tastes from the leftovers, a small bowl of just a couple bites reheated in the microwave.

    For those of you tempted to leave out the cream, yes, you can do that if you want. I’ve tried it without the cream and in my opinion, it’s not nearly as good. Personally I would just eat a smaller portion. Because of the cream it’s more filling and you don’t need as much pasta for a serving.

    Angel Hair Pasta with Shrimp and Parmesan Lemon Cream Sauce Recipe

    • Prep time: 15 minutes
    • Cook time: 15 minutes
    • Yield: Serves 4.

    We used medium shrimp (41-50 per pound) for this recipe, but little cocktail shrimp would also work. Use heavy whipping cream to avoid curdling when mixed and heated with the lemon juice.

    Yum

    Ingredients

    • 3/4 cup heavy whipping cream
    • 1/4 cup chicken stock
    • 3 Tbsp lemon juice
    • 3/4 pound angel hair pasta (also called capellini)
    • Salt and black pepper
    • 1 pound raw medium shrimp, peeled and deveined*
    • 1/2 cup (loosely packed) chopped parsley
    • 1/4 cup (loosely packed) chopped chives
    • Zest of a lemon
    • 1/2 cup freshly grated parmesan cheese

    *To defrost frozen shrimp, place them in a bowl of ice water.

    Method

    1 Bring a large pot of salted water to a boil.

    2 In a smaller pot, heat the cream, chicken stock and lemon juice to a low simmer. Simmer gently for 5 minutes.

    3 Add the angel hair pasta to the boiling water.

    4 Add the shrimp to the simmering lemon cream sauce. Stir well and add a pinch of salt and black pepper. The shrimp should cook in about the same time as the angel hair pasta, about 4 to 5 minutes.

    5 When the pasta is done, drain and put it in a large bowl. Add the herbs to the simmering lemon cream sauce and let them cook for about 1 minute. Pour the shrimp and lemon sauce into the pasta bowl and mix well. Add the lemon zest and most of the parmesan and mix again. Divide into servings, and top with the remaining parmesan.

    Note, if the resulting mixture seems too dry, just add a little water or cream. If it seems too wet, don't worry, the pasta will absorb the sauce.

    post from sitemap
    Read more ...

    Coconut Shrimp with Sweet Chili Mayo

    Please welcome guest author Jaden Hair of Steamy Kitchen as she treats us to fabulous shrimp coated with panko and coconut flakes. ~Elise

    In my kitchen, there are a handful of Asian ingredients that I’m never out of. There’s the usual like soy sauce, oyster sauce and ginger, of course. But, there’s the other category of foods that are so versatile, they can be used in any style of cooking, whether Asian, Italian or Greek.

    And at the top of that list is panko bread crumbs. Panko is a Japanese breadcrumb that really shouldn’t be named “crumb” but rather bread “flakes.” It’s incredibly light, airy and crisp/crunchy when fried.

    What I like about panko is that it doesn’t absorb as much oil or grease as regular breadcrumbs and its super-thin flakes create an airy, lacy coating that you can’t achieve with regular breadcrumbs.

    Making crabcakes? Use panko for a lighter, delicate result. Baked fried chicken is ten times crisper with a panko coating.

    In this recipe, the coconut shrimp is coated in flour, egg/coconut milk and then a panko/coconut flake mixture.

    Do you know why we have to coat the shrimp in all of those ingredients, in exactly that order? Well let’s work backwards. If you want a crunchy coating, whether it’s panko, breadcrumbs, crushed potato chips or crusted saltines – you gotta get it to stick to the food. Try taking a naked shrimp and patting panko on the surfuce. It doesn’t stick well. If you try to fry it, all the coating will come off into the oil.

    But guess what? Panko sticks to egg!

    So does egg stick to shrimp? Nope. It slides right off.

    And hey, egg sticks to flour! Flour sticks to shrimp!

    Now you get it?

    Coconut Shrimp with Sweet Chili Mayo Recipe

    • Yield: Serves 4.

    If you are using frozen shrimp, defrost by placing in a bowl of ice water. Raw shrimp should always be kept chilled. Safety note regarding frying, always keep a lid for the pan close by, as well as ice.

    Yum

    Ingredients

    • 1/4 cup mayonnaise
    • 2 tablespoons sweet chili sauce
    • 1 teaspoon chili-garlic hot sauce (optional)
    • 1 pound tail-on shrimp, shelled but leave tail on
    • 1/2 cup all purpose flour
    • 1 egg
    • 2 tablespoons coconut milk (or regular milk)
    • Salt and pepper
    • 1/2 cup Japanese panko bread crumbs
    • 1/2 cup sweetened coconut flakes
    • Oil, for frying

    Method

    1 In a small bowl, combine the mayonnaise, sweet chili sauce and the chili-garlic hot sauce (optional). Set aside.

    jaden-coco-shrimp-1.jpg jaden-coco-shrimp-2.jpg

    2 With a paring knife, slice down deep at the middle of the back of the shrimp, but do not cut all the way through. Discard the black vein/tract.

    jaden-coco-shrimp-3.jpg
    3 Set three shallow bowls side by side. Place flour in the first bowl; whisk the egg and coconut milk in the second; and combine the panko and coconut flakes in the third.

    4 Heat 2 inches of oil in a sauté pan over moderate heat until thermometer registers 350°F.

    jaden-coco-shrimp-4.jpg jaden-coco-shrimp-6.jpg
    jaden-coco-shrimp-5.jpg jaden-coco-shrimp-7.jpg

    5 As the oil is heating, bread the shrimp by dipping the shrimp on both sides in the flour and shaking excess off. Next dip in the egg/coconut milk mixture and then in the panko/coconut flakes, patting to ensure the coating sticks well.

    6 Fry the shrimp in small batches for 2-3 minutes until golden brown on both sides. Serve with Sweet Chili Mayo for dipping.

    post from sitemap
    Read more ...

    Cod Sautéed in Olive Oil with Fresh Tomatoes

    Please welcome Hank as he shares one of his favorite ways of preparing fish with fresh garden tomatoes. ~Elise

    Tomatoes and fish are a natural pairing. Their sweetness and acidity livens up lean, white fish such as cod, walleye or sole, and it cuts some of the fattiness of oilier fish such as bluefish and mackerel.

    This is a deceptively easy dish that requires a little attention while you are cooking it. You are cooking the fish very gently in the pan, then making what is essentially a warm vinaigrette with the tomatoes and olive oil.

    You might notice that this recipe requires a quarter cup of olive oil. That might seem like a lot, but the oil forms the base of the sauce for the fish. You also need it to baste the fish fillets as they cook. With this method, you never flip the fish. You cook the other side of the fillet by basting it with hot oil. The result is a more delicate flavor that goes a long way toward preventing your fish from falling apart.

    cod-tomatoes-b-1.jpg

    Cod Sautéed in Olive Oil with Fresh Tomatoes Recipe

    • Prep time: 10 minutes
    • Cook time: 10 minutes
    • Yield: Serves 4.

    This recipe will work with a wide array of fish. We made it with Pacific cod, but any lean white fish—walleye, sole, pollock, haddock, redfish, etc.—will work, as would the oilier mackerel or bluefish. We recommend using a thin fillet for this recipe. The thicker fillets take more time to cook, and therefore more time is needed to baste.

    Yum

    Ingredients

    • 1 pound thin skinless fish fillets
    • Salt
    • 1/4 cup olive oil
    • 2 large fresh tomatoes, cut into chunks
    • 2 teaspoons Italian seasoning
    • A splash of Tabasco or other hot sauce
    • Black pepper to taste

    Method

    1 Remove any pin bones from the fillets and pat them dry. Salt the fish fillets well and set out on a cutting board. Heat the olive oil in a saute pan and set it over medium heat for 2 minutes. Add the fish fillets, which should sizzle gently. Cook undisturbed for 90 seconds.

    2 When you see the bottom of the fish fillets turn opaque, tilt the pan and, using a large spoon, baste the tops of the fish with the hot oil. Do this constantly until the top of the fillets begin to flake, about 3 minutes.

    3 Add the tomato chunks, the Italian seasoning and the splash of Tabasco. Swirl around in the pan to combine and let this cook for 90 seconds. Turn off the heat.

    4 Put a fish fillet on everyone's plate. Swirl the tomatoes in the pan and add black pepper to taste; this swirling should emulsify the sauce. Spoon out some tomatoes and sauce for everyone and serve at once.

    Serve with crusty bread and a dry rose wine.

    post from sitemap
    Read more ...

    Coconut Curry Mussels

    When Garrett McCord told me he had the best mussels recipe in the world I was skeptical, that is until I tried it. Yikes this is good! ~Elise

    When I need a good party food or want to impress some friends I usually turn to mussels cooked in coconut milk and curry. It’s affordable, easy to prepare, and has a definite wow factor. I mean, who can’t resist the look of these obsidian peaks jutting out from a plate from canary-colored broth? These mussels take on the flavors of the broth which is spiked with lemongrass, pungent red chilies, and kaffir lime leaves leaving them with a distinct Thai flavor. The mussels themselves imbue the broth with a slight, ocean brine that cuts through the richness of the coconut milk. This recipe will feed four people happily or make an excellent appetizer for a group. This is a dish best served with beer and crusty bread.

    Coconut Curry Mussels Recipe

    • Yield: Serves 4.
    Yum

    Ingredients

    • 2 lbs of mussels, cleaned and debearded
    • 1 tablespoon of vegetable oil
    • 1 yellow onion, chopped
    • 1 thai chili, finely chopped (can substitute good pinch of chili flakes)
    • 3 teaspoons of ginger, minced
    • 1 1/2 tablespoons of curry powder
    • 1/2 cup of chicken broth
    • 1 can of coconut milk (13.5 fl. oz.)
    • Pinch of salt
    • 1 stalk of lemongrass, chopped into four pieces and smashed
    • 3 kaffir lime leaves* (optional)
    • Chopped cilantro
    • Lime wedges

    *Kaffir lime leaf: a key ingredient in Vietnamese, Thai, and Hmong cuisine; can be found in Asian Markets, though many markets now carry them in the produce aisles with other fresh herbs. The taste is very distinct and can't be substituted. However, you can make this dish without the leaves and the mussels will still taste great.

    Method

    1 Place mussels in a bowl of cold water so the mussels will spit out any sand or mud. Let them sit for 10 minutes. Drain and repeat. Toss any mussels that are open as these are dead. Debeard the mussels, pulling out their byssal threads (aka: their "beards") and place them in a bowl of cold water until ready to use.

    2 Heat the oil in a pan and add the onion and stir for a few minutes until they become soft and slightly translucent. Add the chilies, ginger, and curry powder and stir for a minute until fragrant.

    3 Add the chicken broth and reduce half. Add the coconut milk, salt, lemongrass and kaffir lime leaves if using and bring to a boil. Drain and add the mussels, reduce heat to medium and cover with a tight fitting lid. Cook for 6-7 minutes until the mussels open. Discard any that are closed as these were dead before cooking. (Some may only be slightly open, if you have to debate on whether it's good to eat or not, toss it.) Spoon mussels into bowls and pour over with broth. Garnish with chopped cilantro and juice from lime wedges.

    post from sitemap
    Read more ...

    Crab Bisque

    During the winter months, our local Whole Foods gets one or two shipments in a week of freshly cooked Dungeness crab. Like all seafood, crab tastes best when it is as fresh as possible. When buying crab, ask the guy or gal behind the counter when they got the shipment in. The answer you want to hear is “this morning”. If the crab came in that morning, or even the day before, it should be good. If it is 3 or 4 days, I would wait until the next shipment. Make sure that you get a crab that is at least 2 lbs. If they don’t have any that big displayed, ask if they have any more in the back. Have them clean the crabs and crack them.

    To make this creamy, flavorful crab bisque, you will need to make some homemade shellfish stock, so it pays to keep your leftover shells and freeze them until you have the occasion to make the stock. Making stock isn’t hard, like making chicken stock, it just takes time. You can freeze it in advance of using it.

    Crab Bisque Recipe

    • Yield: Serves 4.
    Yum

    Ingredients

    Stock ingredients:

    • 4-6 cups crab shells
    • 1/2 cup dry white wine
    • 1 large yellow onion, sliced or chopped
    • 1 carrot, roughly sliced or chopped
    • 1 celery stalk, roughly sliced or chopped
    • 2 Tbsp tomato paste
    • 2 sprigs of thyme
    • Several sprigs parsley
    • 1 bay leaf
    • 10-15 whole peppercorns
    • 2 teaspoons salt

    Soup ingredients:

    • 2 Tbsp butter, unsalted
    • 1/3 cup shallots, chopped
    • 3/4 cup dry white wine
    • 4 cups of shellfish stock
    • ¼ cup white rice
    • 2 Tbsp tomato paste
    • 1 ¼ lb or more of cooked crabmeat
    • 1 ¼ cup heavy cream
    • ½ teaspoon salt
    • 1/8 teaspoon cayenne pepper

    Method

    Making the stock

    Before making the bisque, you'll need to make the shellfish stock (see these instructions for details and photos).

    1 If you have large pieces of crab shell, you'll want to break them into smaller pieces. A good way to do this is to put them in a plastic freezer bag and use a rolling pin or wine bottle to roll over them to break them up a bit. Don't crush them.

    2 For extra flavor at this point, put them on a roasting pan in a 400°F oven for 10 minutes. That will help bring out more of the crab flavor.

    3 Put the crab shells in a large stock pot and cover with an inch of water. Put the heat on medium high and slowly heat up the water. When you see little bubbles of air starting to rise to the surface, lower the heat to medium. Do not let the water boil! You want to keep the water temp at just below a simmer, around 180°F if you have an instant thermometer. The bubbles should only occasionally come up to the surface.

    Do not stir! Stirring the shells will muddy the stock. As foam develops on the surface of the water, skim it away with a large spoon. Keep skimming off the foam every so often, and maintaining the heat at just below a simmer, for about an hour.

    4 Once the stock is no longer generating foam, add the wine, carrots, onions, celery, tomato paste, thyme, bay leaves, parsley and peppercorns. Increase the heat to return the stock to a low simmer, then lower the heat to maintain that very low simmer for 30 minutes. Skim off any new foam that develops. Add salt and remove from heat.

    5 Use tongs to remove and discard the largest pieces of shells from the stock. Then place a few layers of dampened cheesecloth (can use several layers of dampened paper towels) over a large, fine mesh strainer placed over a large bowl or another pot. Pour the stock through the strainer to strain. Discard the solids.

    Either use the stock right away, or cool for future use. If you aren't going to use the stock in a couple of days, you can freeze it. Remember to leave enough head room at the top of any jar you use so that the liquid has room to expand as it freezes. You should use frozen shellfish stock up within 2 months.

    Makes 2-3 quarts. Reserve 4 cups for the crab bisque, refrigerate or freeze the rest.

    Making the bisque

    Now on to the bisque...

    6 In a large, 4 or 6 quart saucepan, melt butter on medium heat, add the shallots and cook gently until translucent, about 5 minutes.

    7 Add the wine, stock, white rice, and tomato paste. Raise the heat and bring to a simmer; reduce heat to continue to simmer until rice is completely cooked, about 25 minutes. Remove from heat and let cool for several minutes.

    8 Add about two thirds of the crab meat to the soup. Working in batches, ladle the soup into a blender and purée until completely smooth. Return puréed soup back to soup pan.

    9 Add cream and gently heat soup until it is hot enough for serving. Add the remaining one third of the crab meat. Add salt and cayenne pepper to taste (about ½ teaspoon salt and 1/8 teaspoon cayenne).

    post from sitemap
    Read more ...

    Baked Stuffed Clams

    For most California girls, the idea of “digging for clams” isn’t really part of our cultural makeup. But out in Rhode Island, and the beaches south of Cape Cod, digging in the sand for your dinner is apparently a regular summertime activity. My friend Alden (age 8) and her sister Piper (my goddaughter, age 5) took me clam digging this weekend. It wasn’t exactly what I expected. Although we went out in low tide, we still had to get chest deep in the water to find a sandy spot to scrape the bottom of with our toes. We found about 6 empty shells or rocks for every intact clam. We were out for more than an hour, shoulders sunburned and toes scraped, nearly stung by red jelly fish, and managed to get a grand total of 9 clams (3 clams each). I know there are more efficient ways to do this (as I’m sure some of you will tell me), but at the end of the day, it didn’t matter. Hunting for clams was just a great excuse to play in the warm sea water on a beautiful sunny day.

    Here’s the recipe for stuffed clams (also called “stuffies”) that Alden and Piper’s mom Heidi made with our hard-earned catch. Do you have a favorite recipe for stuffed clams? Please let us know about it in the comments. I’ve heard that they are especially good with a little Portuguese sausage mixed in the stuffing.

    Baked Stuffed Clams Recipe

    • Yield: Makes 10-12 stuffed clams. Serves 3-6.

    Although this recipe calls for fresh clams, you can also make this with canned minced clams (use one 6.5 ounce can, drained of all but 1 Tbsp of clam juice). Bake as directed on clam shells, or bake in a casserole dish and use as a dip with crackers.

    If you've purchasing clams, keep them in the refrigerator covered with a damp, wet towel. If you have dug up your clams, keep them covered with cool sea water in a bucket. Throw away any cracked or broken clams.

    Yum

    Ingredients

    • 10 large chowder or quahog clams, rinsed, sand and grit removed
    • 3 Tbsp minced onion
    • 1/2 cup butter (1 stick)
    • 2 Tbsp chopped fresh parsley (or 2 teaspoons dried)
    • 1 clove garlic, minced
    • 1 Tbsp lemon juice
    • 1 cup bread crumbs
    • 1 Tbsp clam juice (or cooking liquid from steaming the clams)
    • Salt and freshly ground pepper to taste
    • 1/4 cup grated Parmesan cheese

    Method

    1 Fill a large pot with 1 1/2 to 2 inches of water. Bring water to a boil. Add the clams to the boiling water. Reduce the heat to a simmer and let the clams steam for approximately 6-10 minutes, until the shells open. Remove clams from the pot and let cool enough to handle. Discard any clams that have not opened (if they haven't opened it means they were dead to begin with and should not be eaten).

    2 Remove the clam meat from the clams (not the clam foot which is attached to the shell) and mince finely. Break apart the clam shells from their hinges. Rinse. Pick 10-12 of the cleanest, nicest looking clam shells and set aside.

    3 Preheat oven to 350°F. In a sauté pan, melt the butter on medium heat and add the minced onion. Once the onions have softened (2-3 minutes), add the garlic. Cook the garlic for 1 minute, then add the parsley, bread crumbs, minced clams, lemon juice, and clam juice. Stir until the stuffing mixture is completely moistened. (If too dry, add a bit more butter or clam juice; if too wet, add a bit more bread crumbs.)

    baked-stuffed-clams-1.jpg baked-stuffed-clams-2.jpg

    4 Lay clam shells on a baking dish. Scoop a little stuffing mixture onto each clam shell. Sprinkle with grated Parmesan. Bake for approximately 20-25 minutes, until Parmesan is lightly browned on top.

    Variation:
    Cook a few strips of bacon until fat renders but not brown or crispy, chop and mix in with the stuffing. Use crumbled up Ritz crackers for the breadcrumbs. So good!

    post from sitemap
    Read more ...

    Bouillabaisse

    Bouillabaisse is a classic French dish from southern France, in particular, of the port town Marseille. It requires many different varieties of fish, and traditionally was made with whatever the fishermen hadn’t sold that morning. There are plenty of variations of bouillabaisse, and even in Marseille you’ll find strong debates over the proper way to make it.

    The most important thing is that you should use several varieties of fish, and the fish should be very fresh. In Provence you would use a variety of Mediterranean fish, but here in the states where we can’t get those fish fresh, we have to make substitutions. Use firm fish for fillets such as sea bass, red mullet, haddock, halibut, cod, conger, or red porgy. Small whole fish can be added as well. Also traditional are mussels, squid, and crab.

    Bouillabaisse Recipe

    • Prep time: 15 minutes
    • Cook time: 1 hour
    • Yield: Serves 6.
    Yum

    Ingredients

    • 3 pounds of at least 3 different kinds of fish fillets
    • 1-2 pounds mussels
    • 1 pound squid or crab
    • 1/4 cup olive oil
    • 1 cup thinly sliced onions
    • 2 leeks, white and light green parts only, thinly sliced
    • 1/4 fennel bulb, thinly sliced, or 1 teaspoon of fennel seeds
    • 2 cloves garlic, crushed
    • 2 large tomatoes, roughly chopped
    • 1 bay leaf
    • 3 sprigs fresh thyme
    • One long, wide strip of orange zest
    • 1/2 teaspoon saffron threads
    • 2 teaspoons salt
    • 1/4 teaspoon freshly ground black pepper
    • Sliced rustic French bread, plain or toasted

    Directions for Sauce Rouille:

    • 1 Tbsp hot fish stock or clam broth
    • 2 cloves peeled garlic
    • 1 small red hot pepper
    • 1/2 teaspoon salt
    • 1/4 cup soft white bread, pulled into bits
    • 1/2 cup olive oil

    Put hot fish stock or clam broth into the bottom of a blender. Add garlic and red hot pepper, salt and bread. Blend until very smooth. With the blender still running, add olive oil slowly and stop the blending as soon as the oil disappears. At serving time pass Rouille in a little bowl along with the bouillabaisse. Each serving is about 1/2 a teaspoon that you stir into your soup. Use gingerly like Tabasco.

    Method

    1 Heat 1/4 cup of olive oil in a large (6-8 quart) pot on medium high heat. When the oil is hot, add the onions, leeks, and fennel. Stir to coat the vegetables with the olive oil. Cook on medium heat until softened but not browned, about 10-15 minutes. Add the crushed garlic, chopped tomatoes, bay leaf, thyme, saffron, salt, and orange zest. Cook until the tomatoes are soft and broken down, about 10 more minutes.

    2 Cut fish fillets into 2-inch pieces. Bring 2 cups of water to a boil. Lay the fish pieces over the vegetable mixture and pour over with 2 cups of boiling water. Bring everything to a boil, and cook, uncovered, for about 5 minutes. Add the mussels, squid, and/or crab, pushing aside the fish so that the shellfish is now covered in liquid, and boil for 10 minutes more, uncovered.

    3 Remove the bay leaves, sprigs of thyme, and orange zest. Add freshly ground black pepper, and more salt to taste.

    4 To serve, remove the fish and shellfish to a platter to keep warm. Place a thick slice of crusty French bread (plain or lightly toasted) in each bowl and put a dollop of the rouille sauce on top of the bread. Ladle the soup broth over the bread, and then portion out fish and shellfish onto the bowls.

    post from sitemap
    Read more ...

    Brazilian Salmon Stew (Moqueca)

    In Bahia in Northern Brazil, there is a savory fish stew called “Moqueca” that they make with local fish. Fernanda Guimaraes Rosa, who writes the Brazilian food blog Chucrute com Salsicha, brought a Vancouver friend’s salmon version of Moqueca to party a while ago, and it was wonderful, my favorite dish of the day. The salmon is marinated first with lime juice, paprika, and cumin, and then simmered with onions, tomatoes, and bell peppers, in coconut milk. It was even better the next day.

    Brazilian Salmon Stew (Moqueca) Recipe

    • Yield: Serves 6-8.
    Yum

    Ingredients

    Marinade:

    • The cloves from 1/2 head of garlic, peeled, crushed, minced
    • 2 Tablespoons of fresh lime juice
    • 3/4 teaspoon of coarse salt
    • 1 Tablespoon of sweet paprika
    • 2 1/2 teaspoons of dry cumin
    • 1 1/2 teaspoons of freshly ground black pepper

    Other:

    • 1 1/2 to 2 pounds of salmon, cut into 2-inch pieces (largish-bite sized pieces)
    • Olive oil
    • 2 medium onions, sliced
    • 1 large bell pepper, seeded, de-stemmed, and sliced
    • 2 medium tomatoes, sliced
    • Salt and freshly ground pepper
    • 1 14-ounce can thick coconut milk
    • 1 large bunch fresh cilantro, chopped, 1-2 cups
    • Freshly cooked rice for serving

    Method

    1 Mix together the marinade ingredients. Let the salmon marinate in this paste for at least 2 hours. The longer, the better.

    brazilan-salmon-stew-1.jpg brazilan-salmon-stew-2.jpg
    brazilan-salmon-stew-3.jpg brazilan-salmon-stew-4.jpg

    2 In a large pan (large covered skillet or Dutch oven), coat the bottom of the pan with a couple tablespoons of olive oil. Add a layer of sliced onions, and then a layer of sliced bell peppers, and a layer of sliced tomatoes. Place the fish pieces, with the marinade, on top of everything, and start layering again - onions, bell peppers, and tomatoes. Sprinkle generously with salt and pepper. Add about half of your fresh cilantro to the top. Pour coconut milk over the top. Drizzle generously with olive oil over the top (several tablespoons).

    brazilan-salmon-stew-5.jpg brazilan-salmon-stew-6.jpg

    3 Bring to a boil, reduce heat to low, cover and let simmer for 30 minutes to an hour, until the vegetables are cooked through.

    Serve with rice; garnish with remaining cilantro.

    post from sitemap
    Read more ...